Showing posts with label Mummy what would happen if.... Show all posts

Wednesday, 13 February 2013

Leaf and Surface Rubbings

Leaf and surface rubbings with kids

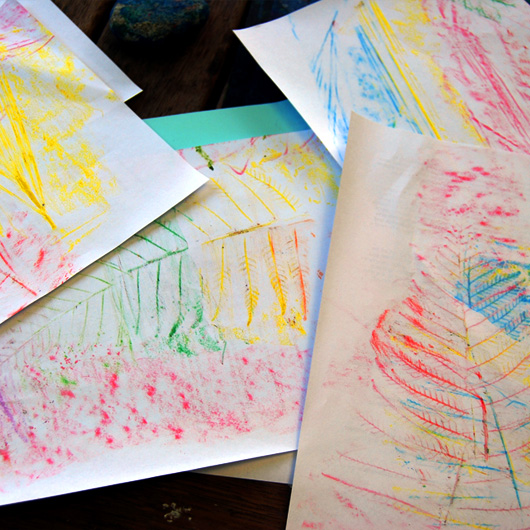
Did you make leaf rubbings as a kid? Yes of course you did... it is a classic. There is something about the whole discovery aspect that makes rubbings so much fun. I keep a small batch of cheap, waxy crayons just for rubbings, these crayons are useless for drawing but are perfect for rubbings. Oil pastels (my favourite type of crayon) do not make very good rubbings. I don't know why.

Leaf and surface rubbings with kids
Rainbow leaf rubbings – ferns work really well
After a morning of ripping leaves out of the garden for rubbings I then encouraged the kids to roam the house with paper and crayon in hand. I sent them on a hunt for interesting textures. It surprised me how much they liked this. They took rubbings of the textured glass in the doors, the tiles in the fireplace, the speakers on the tv, the nail holes in the floor boards, the bottom of a plastic tub, the top of a stool and the tiles in the bathroom. It kept them very busy and happy on a rainy afternoon.

Leaf and surface rubbings with kids

Leaf and surface rubbings with kids

My next plan is to venture down the street with paper and crayons and see what textures we can find in the neighbourhood.

If this is your first visit to At home with Ali – welcome. If you like it, you can follow along via email, RSS, google+ or facebook. You can also find me on Pinterest and InstagramCheers Ali

Pin It

Linked to Tuesday Tots and Kids Get Crafty

Thursday, 12 July 2012

Making a crane


There is a construction site near our house with a huge crane – we like to watch it. I have been thinking about how we could make our own crane... and I finally came up with a solution.

I stored up two thick cardboard rolls (from cling wrap packs) – these are very sturdy and do not bend. I also found a narrow box from amazon which is made from thick, strong cardboard. I hunted around for another cardboard roll, this time it needed to be slightly wider (not longer) than the cling wrap rolls. The only thing I could find was a toilet paper roll, the width was perfect! I would have preferred something a little sturdier though (see design note at the end of this post).

The toilet paper roll needs to fit tightly in the box so I cut the hole slightly too small
Inside the box: I weighed the box down with rocks for stability
I cut a circle in the top of the box so that with a bit of pushing and squeezing, the toilet paper roll fit tightly into the hole. Because of the tight fit I didn't need to secure the roll to the floor of the box but you could apply a little sticky tape or use hot glue. I filled the box with rocks (to weigh it down) and sealed it up. Then I slipped one of my cling wrap rolls into the toilet paper roll and it rotated very nicely.

Folded down edges of the thick cardboard roll to create a nook
For extra strength I taped the rolls together

For the top of the crane I joined the two cling wrap rolls together. With a sharp knife I cut four shallow incisions at the top of the vertical roll. This enabled me to push down the edges and create a little nook for the horizontal roll to sit in it. It also gave me more surface area to apply glue. I used my hot glue gun to apply glue to the pushed down bits and then held the horizontal roll in place while the glue dried. For extra strength I also taped the rolls together with packaging tape.

Because one end is short and one long I decided to glue (with the hot glue gun) a rock into the short end to act as a counter balance.


The rock wasn't enough so I made some little weights using my little concrete blocks. I also made a bucket for the crane by skewering some holes into one of the kids stackable cups. I made a small cut in the top of the horizontal roll for the bucket's string to sit in..... and so, reduce the chance of the bucket flying off as the crane gets swung around.

The kids really like our toy crane... and I will show you how it got played with next week...

Design note: The toilet paper roll succumbed to the pressure of play so I have now replaced it with a paper towel roll instead – it is longer and thicker. I have hot glued the roll in place and I am going to add a layer of sticky tape too. I suspect that this area of the crane will need repair from time to time.

Repaired crane – I replaced the tp roll with a paper towel roll, it is held in place with hot glue.
The new paper towel roll was smaller than the tp roll so I used hot glue to plug the gaps

If this is your first visit to at home with Ali – welcome. If you like it, you can follow along through our facebook page or subscribe via email or RSS. Cheers Ali

Pin It

Linked to It's Playtime, The Sunday Showcase and The Kids Co-op

Saturday, 5 May 2012

Play-dough: make or buy?


Do you make your own play-dough? I do.... but not so I can show off to my mummy friends. I do it because I have weird play-dough psychology. If I buy it, every little bit must be put back in it's airtight container after use, nothing is to be left out! When the play-dough is homemade I am totally laid back about it. You want to keep your play-dough stars out to go dry and crusty – sure. You want to leave some in the garden to get wet and slimy – go for it. You want to paint it and get biscuit crumbs in it – no worries.

It does help that I have found a great no-cook recipe from the Imagination Tree. From experience I always use table salt (rather than cooking salt) to ensure a smooth texture and I also add the food colouring to the hot water.

Here are two projects where our homemade play-dough never made it's way back into the tub.

A little garden...
We created a little garden world from a plastic takeaway sushi box that came with decorative plastic grass. Cakey filled the container with pink play-dough, she added mini paddle pop sticks and stuck flower stickers to some of them. We made a little swing from sticks, a straw, paper clips and sticky tape. Experimenting Mom has made a much better swing using an egg carton for a seat. Cakey loved her little garden, she did not want to pack it up. She kept it on display in her room until the play-dough got really crusty.


A little beach...
This was inspired by a lovely under the sea play-dough scene from Nurturestore. Following a trip to the beach, Cakey wanted to make something beachy but we had no sand or yellow play-dough. Our solution was to paint our blue and purple play-dough yellow and cover the whole lot in glitter!

We made beach umbrellas from patty pans and straws
The pegs are people on their towels

The Imagination Tree has recently updated their brilliant no cook recipe that I use, I haven't had a chance to try it yet. Another recipe I am keen to try is Just for Daisy's microwave play-dough.

Do you have a great play-dough recipe?

If this is your first visit to at home with Ali – welcome. If you like it, you can follow along through our facebook page or maybe think about subscribing. Cheers Ali

Pin It

Linked to Link and Learn, Sharing Saturday

Wednesday, 4 April 2012

Fairy princess flower crowns


I devised these crowns because my self-proclaimed 'non-crafty' friend had to make an easter parade hat for her daughter.... and she asked me for an idea. I emailed her a photo of our fairy princess flower crowns and she made her own version which looks awesome. She is still recovering from the shock of her own craftiness!!


To make a fairy princess flower crown:
  1. Find some thick card (I used 210gsm card). You will need a piece long enough to wrap around your child's head. I only had A4 size so I cut two strips and stapled them together.
  2. If you want ribbons at the back of the crown staple them on at the end of your strip of card.
  3. Cut out three different sized squares of tissue paper – large, medium and small. I used three different colours but use whatever you have on hand.
  4. Glue the large piece of tissue paper (as a diamond) to the middle of the crown – just a small dab of glue in the middle will do as you want the edges to be loose. Follow this with the medium piece (as a square) and then the small piece (as a diamond). Finish off with a sequin in the middle.
  5. Scrunch up the tissue paper to make it look like a flower. The flowers slowly unfold with time but they still look nice and you can simply re-scrunch them.
  6. When your crown is covered with a long row of flowers staple the ends together to fit your child's head.
  7. I added an extra flower to cover up the staples, you may not need to do this.
  8. If these steps make no sense – sigh loudly and then look at the photos and make it up.

Ahhh, fairies and princesses, so much pink and purple – can you get enough? I can. Next week it is time for a bit of dinosaur action.

Pin It

Linked to tip-toe thru tuesday, It's Playtime and Handmade Tuesdays

Monday, 5 March 2012

Sensory play with shaving foam


Something a little different today... sensory play with shaving foam. I hadn't given shaving foam much thought until I came across two amazing ideas. The first was Instant Rain! Instant Fun! (scroll down a bit as this was part of a longer post) from Mrs Karen's Preschool Ideas – a simple experiment using water, food colouring and shaving foam. The second was Cappuccinos and Cakes in the Outdoor Kitchen from Pre-school Play – making coffees with brown water, shaving foam and glitter sprinkles. These two posts made me rush to the supermarket to buy some shaving foam. Below is our version of these two great activities.

The start of play...

One hot afternoon we were on the patio watching the rain... a perfect time to make coloured rain in a jug. I filled our transparent jug with water and squirted shaving foam on top. Then I poured in some food colouring. The food colouring slowly made it's way through the foam and then seeped into the water – simulating rain from a cloud. This was pretty cool!! Once we had done this trick a few times, the girls played in water and shaving foam until the can was empty.

...and the end of play.

Another day, another can of shaving foam put to use. I set up the outdoor table with cups, spoons, jugs of water mixed with dirt as 'coffee', glitter as 'chocolate sprinkles', a tub of flour as 'sugar' and a can of shaving foam as the 'milk froth'.


The girls were busy making coffees for more than half an hour. Boo loved the flour tub and spoonful after spoonful of 'sugar' were stirred into the cups. Cakey got to use the can of shaving foam so she was a very busy little barista. And of course, these cappuccinos were the most sprinkly and glittery coffees that you have ever seen!


For another fun shaving foam idea that we haven't got around to yet, check out Bathtub Painting from The Outlaw Mom.

Note: During this activity I kept my eye on Boo to make sure she did not eat the shaving foam. Shaving foam looks delicious but isn't.

Pin It

Linked to Link and Learn, Fun Stuff Fridays, It's Playtime and Tuesday Tots

Tuesday, 28 February 2012

Accessorising a doll's house


Thanks to their grandparents Cakey and Boo were the very lucky recipients of a doll's house at Christmas. This house also came with a stash of lovely pink and white furniture. I decided that I wanted to make some accessories to go with it.

Spaghetti and meatballs and sausages (looking a tad like poo) with a carrot and spinach

The first thing I tackled was some plates of food. When the kids were asleep I cut out two pieces of white card to act as plates. I then moulded my fake food from little pieces of tissue paper and glued them into place with a generous amount of pva glue. To be brutally honest, the spinach was supposed to be peas but as I stuck each 'pea' down the tissue paper unfolded itself so it ended up looking like a pile of wilted spinach. To make the spaghetti I use little pieces of wool and added meatballs made from tissue paper on top.

Once the glue was dry, I painted my little dinners to resemble actual food – spaghetti and meatballs with a tomato sauce; and sausages with a carrot and spinach.

When Cakey discovered them in the doll's house she was very excited. She wanted to make some too. I set her up with some wool, tissue paper and a couple of milk bottle lids and she made some little dinners.

Cakey's bowls of food
The next step was to create some wall hangings for the doll's house. I cut out a couple of small pieces of heavy construction paper – and Cakey painted her contemporary artworks on them. Once dry, I mounted them onto cardboard and glued on little gold cords ready for hanging.

Our little paintings
Last but not least, Chris got out the sewing machine and made a little bed covering out of an old tea towel. Now the dolls can stay nice and warm.

Warm and cosy dolls
I have a few more plans such as towels for the bathroom, some floor mats and bean bags. If you have a doll's house that needs accessorizing or want to make your own doll's house have a look at Red Ted Art's blog – there is a great post about how to make a bathroom and a very cosy bed. I also love the retro decoration of the doll's house by silly eagle books.

Pin It

Linked to Made with Love and Kids Get Crafty

Tuesday, 21 February 2012

Making our Own Weir


Lately I have been inspired by the blog Science Sparks which is all about doing simple scientific experiments with young kids. As a result, I have been on the look out to add a bit of science into our activities... and the perfect opportunity arose.

The real weir
We were at a park the other day after some heavy rain. This particular park has a series of drainage weirs leading into wetlands. The top weir was draining into a lower pond – causing a waterfall. Cakey was very interested in this and wanted to know why and how. Her questions got me thinking about how I could demonstrate it to her rather than trying to explain.

Setting up our weir
When we got home we got to work making our own weir. I cut out a small section in the side of an ice cream container to mimic the real weir and then placed it into a big tub. We then weighted the ice cream container down with rocks. Cakey added a small amount of water to the bottom of the tub and I mixed in a few drops of blue food colouring. I then added a few drops of yellow food colouring to the ice cream container.

Adding water with a jug
We were all ready! Cakey began to pour water into the ice cream container. As the level reached the cut-out section the water started to cascade over, making a little waterfall. The yellow water from the container mixed with the blue water in the tub and turned green.

This experiment worked really well. Cakey was excited because she was creating her own waterfall and Boo was excited because there was coloured water to play with.

Adding water with the hose
We repeated this experiment over and over, using a variety of different food colouring to watch the mixing effects as the weir overflowed with a cascade of water.

Pin It

Linked to The Kids Co-op, Fun Sparks, It's Playtime and Learning Laboratory

Monday, 13 February 2012

Making a picture puzzle as a gift


Cakey wanted to make a puzzle for her Grandma J's birthday. We decided the best way to do this was to paint a picture and then cut it up. I was not in the mood for dealing with the mess of acrylic paints so I got out our little watercolour paints instead.

I found a beautiful piece of A4 watercolour paper that I taped to the table. I wanted to avoid too much paper warping as Cakey uses a large amount of water. For some reason I forgot to put a messy mat underneath before I taped it... sigh! I also gave Cakey some watercolour crayons to try out (which failed to impress her), a paintbrush and a tub of water.

Cakey painted a lovely picture and particularly enjoyed tapping the brush to make 'little coloured raindrops'. This went so well she wanted to make another – this time I taped down a thick piece of pink construction paper which worked just as well.

painting puzzle

Once Cakey's paintings were dry I unpeeled the tape and photographed them. Then we cut them up. I cut one painting up into nice regular squares. Cakey cut the other into irregular wonky shapes. I had to put a halt to her cutting as the pieces were getting smaller and smaller and any chance that Grandma J was going to be able to put it back together were getting slimmer and slimmer.

I did a test – I put them back together when Cakey was asleep. Her irregular shaped one was far easier than my regular one. Ha – the 3 year old does know best!

Gift for grandma

We packed the picture puzzles into a pink box and I stuck the photos of the complete pictures on top.... and then we posted it to Grandma J.

If this is your first visit to At home with Ali – welcome. If you like it, you can follow along via email, RSS or facebook. You can also find me on Pinterest and InstagramCheers Ali

Pin It

Friday, 20 January 2012

100 Acts of Kindness Project


My family is participating in the 100 Acts of Kindness Project. I think this is a great idea, particularly so soon after the Christmas period. Christmas is a lovely time for my kids but I find that we are left with a bit of a Christmas hangover – too much stuff and attention in a very short space of time. The Kindness Project has been a great way to focus on other people.

To record our acts of kindness I created a poster on a large sheet of black construction paper. I left room to draw a banner and divided the rest of the space into 100 numbered squares. This poster is taped to the wall in our family room. I have cut up 100 hearts from old wrapping paper, discarded paintings by Cakey and anything with a nice pattern or image that I had lying around. When one of us performs an act of kindness they are awarded with a paper heart to stick onto the poster. I also record what that act was in an exercise book. Here's a sample:
  • Cakey helped her friend when she fell off her chair.
  • Daddy took the girls out so mummy could have a peaceful sleep-in.
  • Boo gave her friend a biscuit.
  • Mummy let someone go in front of her in the supermarket shopping queue.
As you can see these acts are quite small but they have been a fantastic way to start a conversation about kindness.

Photobucket