Showing posts with label Christmas. Show all posts

Monday, 9 December 2013

Christmas Pudding Decorations


Oh golly gosh these Christmas plum pudding decorations are so cute. Cakey and I had a great time making them and they look fab hanging on our Christmas tree.  I love a tree filled with homemade and kid-made Christmas ornaments.... don't you? Check out some of our other homemade tree decorations here and here. And keep reading to find out how to make these little puddings! 


Materials needed:
Small polystyrene balls (40mm)
Wooden skewers
Brown paint
White air drying clay
Red beads and green leaves
String and an anchor bead


Step 1: Skewer your polystyrene balls onto a wooden skewer and paint them a pudding brown. The kids made their own brown paint.... after all, they have had many years of practice making brown paint (they used a mix of red, purple and yellow). Leave the painted puddings to dry completely. 

Step 2: Once the paint is dry remove the skewers. Mould some white air drying clay over the top of each pudding ball – try to make the clay look like custard dripping over the pudding. Before the clay is dry make sure you re-open the hole created by the skewer - otherwise you won't be able to thread a string through the pudding.

Step 3: To decorate the puddings, push red beads and green decorative leaves into the clay before it dries. Sometimes the beads fall off once the clay has dried – glue them back on with superglue.

Step 4: Once the clay is completely dry, grab a needle and thread. Tie a bead onto the string to act as an anchor and thread the needle through the hole left by the skewer. Tie the string at the top to make a loop and hang it on your Christmas tree.


And there you have it! For more Christmas goodness have a look at my Christmas Pinterest board

You may also like to check out some of these kid-friendly Christmas crafts:
Icicle Ornaments by Happy Hooligans
Popstick Wreath by Childhood 101
Toilet Roll Reindeer by The Craft Train

If this is your first visit to At home with Ali – welcome. If you like it, you can follow along via email, RSS, google+ or facebook. You can also find me on Pinterest and InstagramCheers Ali

Pin It

Thursday, 20 December 2012

Peppermint Playdough

Christmas gift of peppermint playdough

I wanted to give something to the kids from our mothers group. I am so grateful to still be meeting up with this wonderful group of mums and kids after 4 and a half years. As I enjoy making playdough and the kids love playing with playdough I decided to make some Christmas peppermint playdough. (I am also grateful to all you readers out there – I wish I could give you all some peppermint playdough)

I make a no-cook playdough. Here is the recipe:

Playdough Recipe

  • 2 cups of plain flour
  • 1/2 cup of salt
  • 2 tablespoons of cream of tartar
  • 2 tablespoons of vegetable oil
  • 1 and a quarter cups of boiling water mixed with your food colouring of choice
  • 6 drops of peppermint oil

Mix all the dry ingredients in a bowl. Add the vegetable oil and peppermint oil. Add the food colouring to the boiling water and then add it to the flour mixture, stir with a spoon. Once the mixture has cooled enough to touch, knead the dough on a floured surface. If the mixture is too soft add more flour, if it is too firm add more water.


I made three batches of playdough (red, light green and white) to make six gift packs. For the white I replaced the plain flour with corn flour. This makes a really white white. When I use corn flour I reduce the amount of water to one cup.


I divided each batch of playdough into six portions and individually wrapped them in cling wrap. Each gift pack contained a portion of red, green and white playdough with a few accessories – red and white patty pans, pom poms and two candy canes. The whole lot was wrapped in clear cellophane and tied up with a pipecleaner.

Peppermint playdough

Playdough makes such a nice gift. If you want more playdough ideas have a look at my Playdough Magic Pinterest board. And you can find all of our Christmas craft right here.

A few more playdough ideas:
Minty Candy Cane Scented playdough Christmas ornaments from Learning 4 kids
A gift of homemade lemon sparkle playdough from An Everyday Story
Woody playscene with pine scented playdough from Small Potatoes
Gingerbread playdough by The Sweet Adventures of Sugarbelle

If this is your first visit to At home with Ali – welcome. If you like it, you can follow along via email, RSS or facebook. You can also find me on Pinterest and InstagramCheers Ali

Pin It

Saturday, 15 December 2012

Beads and Buttons – Christmas ornaments

Christmas ornaments with beads and buttons

After the success of combining beads and glue last year I thought we might do it again.... but this time on a smaller scale. We turned our bottle top collection into Christmas ornaments. I poured pva glue into each bottle top... some overflowed causing a gluey mess which irritated me and delighted them. The kids decorated them with beads, buttons and glitter. The heavier beads sunk to the bottom of their white pva ponds.

The kids filled many, many bottle tops. Boo overfilled hers with the larger buttons and beads and Cakey went glitter mad.

Christmas craft beads

Christmas craft buttons glitter

Now the bad news, I did have to do a little pre-prep. I wanted to be able to hang these decorated bottle tops on the Christmas tree. I could have just taped a string to the back of them but I wanted something more secure.

Christmas decorations bottle tops

I poked a hole in each bottle top (milk lids are fairly soft so this was easy, juice bottle lids are rigid so they went back into the bowl) with my pointy cake tester. I thread some thin beading wire through the hole and twisted it so it would hold. Once the glue was poured the twisted wire knot was hidden from view. And now, our decorated bottle top ornaments are looking lovely on our Christmas tree. You can find all our Christmas craft ideas here.

For more bottle top crafts have a look at:


If this is your first visit to At home with Ali – welcome. If you like it, you can follow along via email, RSS or facebook. You can also find me on Pinterest and InstagramCheers Ali

Pin It

Linked to Rainy Day Mum, The Sunday Showcase, It's Playtime and The Kids Co-op

Monday, 10 December 2012

Paper Plate Christmas Wreaths


Our paper plate Christmas wreaths were so much fun to make. Both kids loved them and made them their own..... and they spent ages at the craft table, which always makes me happy. The girls were so excited about this wreath craft that they insisted their Dad join them and make one too – he normally stays well away from the glue and sparkles.


There is nothing terribly complicated about this craft. I did do some preparation when the kids were asleep but it didn't take long. I cut the middle out of a stack of paper plates to use as the base of our wreaths. I also cut up Christmas scrapbooking paper into strips... and that was it for the pre-prep.

When the kids were ready to craft I handed over my stack of pre-cut bits, added some tubs of pva glue and paintbrushes and found some Christmassy sparkles. Then I let the kids go for it while I sat down and made my own wreath.... I wasn't going to miss out on all the fun!!


This craft suited both girls, they made their wreaths to suit their age and level. Boo (2.5) glued a little bit of decoration onto a lot of paper plate wreaths. Cakey (4.5) spent more time gluing a lot of decoration onto a few wreaths.

Clockwise: Cakey's wreath, Chris' wreath, my wreath and Boo's wreath
While we waited for the glue to dry, Cakey and I threaded bells onto gold cord. We wanted the bell to dangle in the middle so we punched a hole at the top and taped the cord in place on the back of each wreath. I have displayed them on our mantle piece so Santa can get a good look at them on his way down the chimney.


For more wreath ideas have a look at Easy Toddlers Christmas Wreaths by Mummy Musings and Mayhem.

If this is your first visit to At home with Ali – welcome. If you like it, you can follow along via email, RSS or facebook. You can also find me on Pinterest and InstagramCheers Ali

Pin It

Linked to Kids Get Crafty and Tuesday Tots

Wednesday, 5 December 2012

Big and Little – Santa's Village

Santa's village made from cookies, chocolate and sweets

Well all good things must come to an end... this is the last post in our Big and Little Pretend Play series. But not to worry, Jill and I have some exciting, new ideas we are working on – stay tuned in 2013.

NOW get your toothbrush ready and have a look at our edible little Santa's village. Pop over to A Mom with a Lesson Plan to see her Big Pretend Play Santa's village... it is so gorgeous.

Santa's little village

I have seen lots of beautiful gingerbread houses on Pinterest but making my own gingerbread is way beyond my kitchen skills. I also have no idea where you can buy gingerbread house kits in Australia, in fact maybe you can't. So we did the next best thing, we decorated cardboard! I saw this idea in Jane Bull's book The Christmas Book. The kids and I went shopping to buy all the ingredients.

For the cottages:

  • 2 small cardboard milk containers (which I emptied and cleaned)
  • 1 packet of chocolate finger biscuits (cookies), I used Cadbury
  • Chocolate freckles
  • Jelly beans
  • Plain Sao crackers

For Santa's sleigh:

  • 1 packet of plain sweet biscuits (cookies), I used Arnotts milk coffee
  • 1 packet of chocolate finger biscuits (cookies), I used Cadbury
  • 1 packet of round chocolate wheaten biscuits (cookies), these are similar to chocolate covered digestive biscuits
  • Chocolate marshmallow logs
  • Candy canes
  • Foil covered chocolates to fill the sleigh
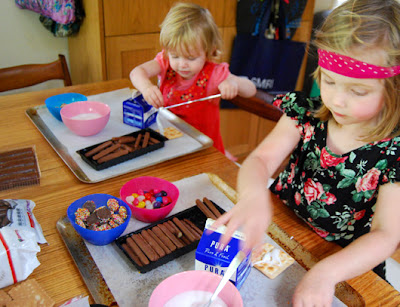
I made a big batch of icing to act as the glue. I mixed icing sugar (powdered sugar) and water to a nice thick consistency (for a strong gingerbread glue have a look at this recipe). Each kid had their own Santa's cottage decorating station on a large baking tray.

Making Santa's village
Getting started on their cottages
Making Santa's cottage
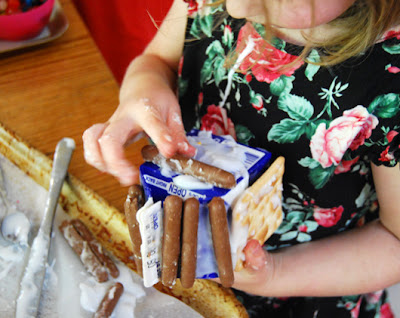
Trying to get those chocolate biscuits to stick

Cakey was determined to cover her cottage with chocolate biscuits, the biscuits worked much better placed horizontally. Boo was not interested in the milk container but she enjoyed decorating the Sao crackers with icing and lollies. Cakey and I happily decorated Boo's cottage for her. Once the cottages were finished we rushed them to the fridge so that the icing would set.

Santa's village

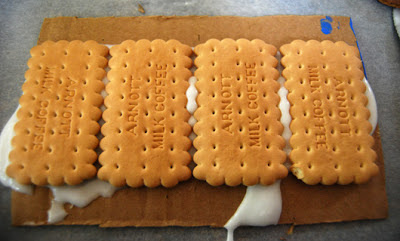
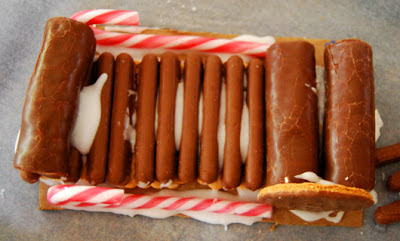
I made Santa's sleigh. It was easier than the cottages because we didn't have to deal with gravity. Starting with a piece of cardboard, I glued down four biscuits (cookies) with icing. I then layered chocolate finger biscuits on top to make the floor of the sleigh. I placed two marshmallow logs at one end to make a comfy seat for Santa. A round chocolate wheaten biscuit was stuck on either side of the marshmallow logs to complete the seat. Two candy cane runners were glued (with icing) directly onto the cardboard along the side of the biscuit layers. And finally, another marshmallow log was stuck to the front of the sleigh to hold all the goodies in. The sleigh followed the cottages into the fridge.

Santa's sleigh
Sleigh base
Santa's edible sleigh

The next day, shortly before friends were due to arrive, we set up our little Santa's village as a table display. The kids sprinkled icing sugar over it to make it white and snowy. We included some little Santa sacks that we had filled with sweets for the visiting kids. The girls loved showing their friends Santa's village and their friends loved taste-testing the village.

Little Santa sacks
Red Santa sacks

If this is your first visit to At home with Ali – welcome. If you like it, you can follow along via email, RSS or facebook. You can also find me on Pinterest and InstagramCheers Ali

Pin It

Linked to Link and Learn, It's Playtime and The Kids Co-op

Tuesday, 27 November 2012

Christmas salt dough ornaments


We have been making a lot of our own Christmas decorations lately... mainly because it is something fun to do. I actually went out to the Christmas shops to buy some new decorations but they were all a bit cheap and nasty. In the end I didn't bother, I think we will just stick to making them.

Speaking of making Christmas decorations we have made some fabulous salt dough ornaments. I have found a new recipe for salt dough and I like it. It is based on a recipe I found at Mum in the Madhouse, but I have adapted it a little.

Salt Dough Recipe
2 cups of table salt (I find cooking salt too coarse)
1 cup of water
1 teaspoon of oil
1 cup of plain flour
1 cup of corn flour
Approximately half to one cup of cold water (during the kneading process)

Instructions: Combine the salt and one cup of water in a saucepan. Bring to the boil, let the salty mixture bubble for a few minutes while stirring. I thought this process might dissolve the salt completely but it didn't. After a few minutes take the saucepan off heat and add flours and oil. Stir vigorously. This is when I looked at my mixture dubiously – it was not a dough. I poured the whole lot on to the kitchen bench. When it had cooled the kids helped me with the kneading. I slowly added cold water to the mix until we had a good dough consistency. Once you have turned your dough into shapes or sculptures bake in the oven at low heat (150ºC or 300ºF) for 3 to 4 hours. Keep an eye on it so the dough does not burn.

salt dough mix
The mixture after cooking the salt and adding in the flour
salt dough christmas ornaments
Let's knead
Once the dough looked like a dough I divided it in half. I rolled out a portion for each kid and they cut out their Christmas shapes. Cakey poked a hole in each shape with a straw so we can string them up on the Christmas tree. I carefully laid each shape on a lined baking tray and we baked the dough in the oven for 4 hours at a low temperature. If your kids won't wait for hours to get their hands on their salt dough try Rainy Day Mum's quick microwave salt dough.

Making the shapes, I dusted some flour on the bench to stop the dough sticking

salt dough ornaments
Our salt dough shapes after baking in the oven for 4 hours

We didn't get to paint our salt dough until the next day. Every single piece was painted and glitter was added too. I have stored the ornaments away in an air tight container ready for the Christmas tree. These salt dough ornaments are going to look fantastic! (Note: if you have issues with humidity you might want to seal with with a varnish as recommended by Learning 4 kids).

Painting salt dough

Christmas tree decorations salt dough

You can find all our Christmas craft ideas here.

If this is your first visit to At home with Ali – welcome. If you like it, you can follow along via email, RSS or facebook. You can also find me on Pinterest and InstagramCheers Ali

Pin It

Linked to The Kids Co-opKids Get CraftyIt's Playtime and Tuesday Tots

Tuesday, 20 November 2012

Christmas cards with paper snowflakes


I was born and raised in Australia – where it is regularly over 35˚C (95˚F) on Christmas day. Hot Christmases are completely normal for me... and yet, I love the winter wonderland theme at Christmas time. I guess I am not the only one – our shopping centres display fake snow at Christmas even though all the shoppers are wearing thongs and shorts!

With Christmas approaching I was inspired to make paper snowflakes with the kids. I followed the instructions from Bon Temps Beignet. She does a brilliant job of explaining how to get the folds right so I am not going to do that here. My advice is to spend 5-10 minutes of non-kid time to get the first snowflake right. Once you have mastered one, it is easy and you will blow your kids' minds with your snowflake prowess!

This is how our paper snowflake craft session unfolded: 

I fold the paper, I cut the paper, I hand the paper over to the first child to unfold, child unfolds the paper to reveal a stunning paper snowflake, mouths drop open, eyes go wide, second child yells "I want one, I want one".... repeat.

I did have a roll of sticky tape nearby to fix any tears that were inflicted on the paper snowflakes during the 'unfolding'.

Eventually Cakey wanted to make them herself. I had a stack of very thin, green paper which I folded for her. She was able to cut out the patterns herself which meant Boo could monopolise my snowflake output. (Last year we made a simpler and technically inaccurate version of a snowflake).

Cakey's snowflakes

After the snowflake craft was abandoned I was left with a bowl full of paper snowflakes. They were so pretty I tucked away my favourites and waited for inspiration. A few days later, a large roll of thick watercolour paper conked me on the head as it fell from a high shelf... it really did, honest. It gave me an idea – combine the snowflakes with the watercolour paper to make Christmas cards.

Adding layers – snowflakes glued on and then stencilled with stamp pads

That evening I glued the snowflakes onto the watercolour paper and left it to dry. I had watched a video clip of Julie Balzer make a lovely layered stencilled design so I thought we could attempt something similar. Cakey and I sat side by side and we stencilled patterns onto the paper with stamp pads and coloured ink. Cakey also added a few stamps of her own. They were blotchy and imperfect which suited us just fine.

Watercolour wash over the top
I was pretty darn excited with how this was turning out. Once the kids were in bed I borrowed their watercolour paints and added some colour washes over the top.


I spent an afternoon cutting up the large decorative piece of watercolour paper. I turned it into Christmas cards and lots of different sized present tags. Cakey sat beside me and rounded the corners with our new corner cutter. Unfortunately we lost a few good ones... Boo is currently going through a  "let's cut up everything with my new scissor skills" phase so a few of the tags were chopped up into tiny pieces before I noticed.


If this is your first visit to At home with Ali – welcome. If you like it, you can follow along via email, RSS or facebook. You can also find me on Pinterest and InstagramCheers Ali

Pin It

Linked to It's Playtime, The Kids Co-op, Kids Get Crafty, Holiday FunTuesday Tots and Christmas Countdown

Tuesday, 6 November 2012

Christmas Advent Calendar mini envelopes


My kids are super excited about Christmas, I am rarely excited by Christmas. I let to-do lists get in the way of enjoying the Christmas lead up. Last year on the 14th of December I bought a cheap chocolate filled advent calendar. Cakey loved it, probably because she got to eat 14 days worth of chocolate in one go. This year I thought I would make more of an effort!

I love paper craft so I decided to make my own Christmas advent calendar consisting of 24 mini envelopes (x 2) filled with chocolate coins, stickers and special notes from Santa's elves. I devised a design that is hugely labour intensive... meaning that I am likely to do this only once. Having said that, it is very cute and I am happy with the way it has turned out.

The supplies (you can download the envelope template below)

I designed a printable template for mini envelopes (which you are free to download) that I printed on Christmas scrapbooking paper. Here are the steps to make them:

  1. Cut scrapbook paper to fit printer.
  2. Print mini envelope template on the white side of the scrapbook paper (2 envelopes to a page).
  3. (optional) Score the folds with a bone folder, this makes it easier to fold the flaps later.
  4. Cut around the envelope template using a scalpel or stanley knife and ruler.
  5. Fold all the flaps and glue together with a gluestick.
  6. Wipe up any excess glue and place the envelopes between the pages of a thick book so that they dry flat.
  7. Apply the date to the front of the envelopes – I used number stamps that I found in the scrapbooking section of Kmart but you could simply write the number on in gold ink.
  8. (optional) Cut rounded corners on the envelope flap using a corner cutter (I dropped my 10 year old corner cutter during this project, it smashed and I wimpered, goodbye corner cutter I will miss you).
  9. Fill your mini envelopes with skinny things – I chose coins, chocolate money, stickers and little notes from Santa's elves (you can download the notes too).
  10. On November 30th arrange your little envelopes for your kids to find in the morning. I am going to peg them to a little fake Chirstmas tree.

Want the template for the mini envelopes – click here
Want the little notes from Santa's elves – click here
Like the idea but think I am mad to spend my evenings cutting out mini envelopes.... yes well, my smart mother in law suggested buying those lovely bright red envelopes from Chinatown – same concept but a lot less work!


If you are in the mood to get a bit Christmassy have a look at my Christmas Pinterest Board. Stay tuned for more Christmas ideas in December – I have a few things planned. For more Christmas Advent Calendar ideas check out this post from Rainy Day Mum.

If this is your first visit to At home with Ali – welcome. If you like it, you can follow along via email, RSS or facebook. You can also find me on Pinterest and InstagramCheers Ali

Pin It

Linked to Holiday Funfestive fridaytip-toe tuesday and Countdown to Christmas