Showing posts with label BIG and LITTLE. Show all posts

Wednesday, 5 December 2012

Big and Little – Santa's Village

Santa's village made from cookies, chocolate and sweets

Well all good things must come to an end... this is the last post in our Big and Little Pretend Play series. But not to worry, Jill and I have some exciting, new ideas we are working on – stay tuned in 2013.

NOW get your toothbrush ready and have a look at our edible little Santa's village. Pop over to A Mom with a Lesson Plan to see her Big Pretend Play Santa's village... it is so gorgeous.

Santa's little village

I have seen lots of beautiful gingerbread houses on Pinterest but making my own gingerbread is way beyond my kitchen skills. I also have no idea where you can buy gingerbread house kits in Australia, in fact maybe you can't. So we did the next best thing, we decorated cardboard! I saw this idea in Jane Bull's book The Christmas Book. The kids and I went shopping to buy all the ingredients.

For the cottages:

  • 2 small cardboard milk containers (which I emptied and cleaned)
  • 1 packet of chocolate finger biscuits (cookies), I used Cadbury
  • Chocolate freckles
  • Jelly beans
  • Plain Sao crackers

For Santa's sleigh:

  • 1 packet of plain sweet biscuits (cookies), I used Arnotts milk coffee
  • 1 packet of chocolate finger biscuits (cookies), I used Cadbury
  • 1 packet of round chocolate wheaten biscuits (cookies), these are similar to chocolate covered digestive biscuits
  • Chocolate marshmallow logs
  • Candy canes
  • Foil covered chocolates to fill the sleigh
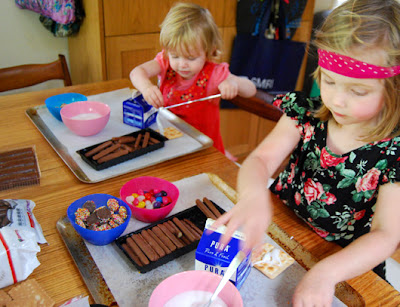
I made a big batch of icing to act as the glue. I mixed icing sugar (powdered sugar) and water to a nice thick consistency (for a strong gingerbread glue have a look at this recipe). Each kid had their own Santa's cottage decorating station on a large baking tray.
Making Santa's village
Getting started on their cottages
Making Santa's cottage
Trying to get those chocolate biscuits to stick

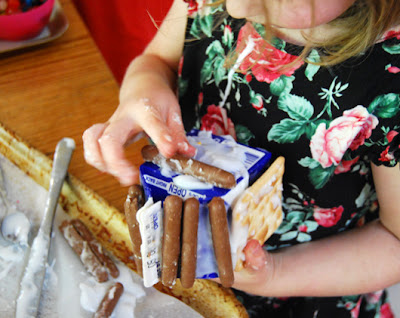
Cakey was determined to cover her cottage with chocolate biscuits, the biscuits worked much better placed horizontally. Boo was not interested in the milk container but she enjoyed decorating the Sao crackers with icing and lollies. Cakey and I happily decorated Boo's cottage for her. Once the cottages were finished we rushed them to the fridge so that the icing would set.

Santa's village

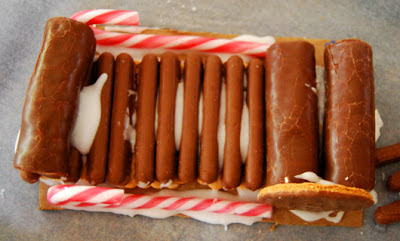
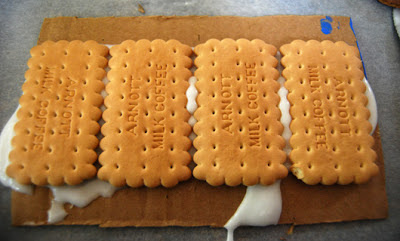
I made Santa's sleigh. It was easier than the cottages because we didn't have to deal with gravity. Starting with a piece of cardboard, I glued down four biscuits (cookies) with icing. I then layered chocolate finger biscuits on top to make the floor of the sleigh. I placed two marshmallow logs at one end to make a comfy seat for Santa. A round chocolate wheaten biscuit was stuck on either side of the marshmallow logs to complete the seat. Two candy cane runners were glued (with icing) directly onto the cardboard along the side of the biscuit layers. And finally, another marshmallow log was stuck to the front of the sleigh to hold all the goodies in. The sleigh followed the cottages into the fridge.
Santa's sleigh
Sleigh base
Santa's edible sleigh

The next day, shortly before friends were due to arrive, we set up our little Santa's village as a table display. The kids sprinkled icing sugar over it to make it white and snowy. We included some little Santa sacks that we had filled with sweets for the visiting kids. The girls loved showing their friends Santa's village and their friends loved taste-testing the village.

Little Santa sacks
Red Santa sacks

If this is your first visit to At home with Ali – welcome. If you like it, you can follow along via email, RSS or facebook. You can also find me on Pinterest and InstagramCheers Ali

Pin It

Linked to Link and Learn, It's Playtime and The Kids Co-op

Friday, 2 November 2012

Big and Little..... Explorers sensory play

Big and Little is back... and this time we chose the theme Explorers. Before you read on head over to A Mom with a Lesson Plan to check out her awesome BIG backyard explorer dress up. Jillian and her kids have made some great props for their backyard adventures. go now, I'll wait.....

Now onto my little explorers sensory/pretend play set-up. I was inspired by the book We're Going on a Bear Hunt by Michael Rosen and Helen Oxenbury for this activity, where a family make their way through grass, water, mud and snow to find a bear.


So, early one morning while the kids were glued to the television I set up some LITTLE explorer fun. It was a total surprise to to them when they discovered four sensory stations (with a little challenge in each) set up outside:

  1. A tray of GRASS clippings. The challenge: under the grass I drew 2 lines – one would lead to the next station and the other straight into the arms of a yellow monster arrrrrgh.....
  2. A tub full of blue coloured WATER. The challenge: I placed a sea monster and some sharks in the tub, the kids would need to find some boats to get their figurines safely across.
  3. A baking tin filled with MUD. The challenge: I placed a couple of 'poisonous' lizards in the mud, the girls would need some stones for their figurines to hop across.
  4. A tray with a mountain of shaving foam as SNOW coloured with green food colouring. The challenge: find the treasure (gold coins) hidden in the mountain.


I asked the girls to pick out their favourite toy figurine and explained how this little game would work. Cakey has watched her fair share of Dora so she totally got it. Cakey started at the grassy forest and made her figurine take the challenge. Boo took one look at the whole set-up, dropped her figurine, ran around the grass, water and mud and dived straight into the shaving foam.


Cakey made her figurine go through the course over and over. I had to keep re-making the snow mountain as Boo kept destroying it before Cakey's figurines made it to the end.


Once the figurines were discarded the kids mixed all the ingredients together.... creating a lovely sensory mess!!

I hope you have enjoyed this month's Big and Little. If you want to see more about our Big and Little posts click here. If this is your first visit to At home with Ali – welcome. If you like it, you can follow along via email, RSS or facebook. You can also find me on Pinterest and InstagramCheers Ali


Pin It

Linked to Mom's LibraryThe Sunday Showcase, The Kids Co-op and The Children's Bookshelf

Saturday, 29 September 2012

BIG Pretend Play Office


Today Jillian has posted her BIG pretend play office over at A Mom with a Lesson Plan. I love it, the kids and I will be busy tomorrow getting out our office supplies for some serious play! Go on.... take a look.....

If you didn't see it, have a look at our LITTLE office tower, the girls and I had so much fun talking about office work and making our tower.

Cheers
Ali

PS  Big and Little will be back again next month with a new theme.

If this is your first visit to at home with Ali – welcome. If you like it, you can follow along through our facebook page or subscribe via email or RSS. Cheers Ali

Thursday, 27 September 2012

Big and Little... The Office


BIG and LITTLE is back for September and the theme is office. Tomorrow Jillian will reveal her BIG pretend play office over at A Mom with a Lesson Plan..... but today I get to show you our LITTLE Office Tower made for some special toys. If you are new to BIG and LITTLE you can read about it here.

I found a shallow and sturdy grocery box for the office tower structure. To make the dividing floors, I cut two pieces of cardboard to size and glued them in with my hot glue gun. I also added a generous layer of sticky tape to withstand energetic play. The top floor was for Cakey's toy animal and the middle floor was for Boo's toy animal. We all decided the bottom floor should be a cafe. After all, those hard working office animals need their caffeine!

Making office art

The girls made little cardboard laptops and calculators for their animals. They also created some art for the office walls with crayons and cardboard. We got the stamping kit out to make little books. Cakey and Boo love stamping – they had a lovely time stamping everything and drawing in the little books.

Writing in the little office books

I stockpile little boxes – they all came out for this project. I covered the boxes in coloured paper to brighten things up. The girls chose their desks and we glued them in place... all ready for their laptops. We made bookshelves from sticky tape boxes. I cut them in half, we stacked them and taped them in place. The shelves were quickly filled with books.

For the cafe we made some bowls and cups from air drying clay. I made a vase and a coffee machine. The air drying clay was left to dry before it was painted. We use air drying clay regularly. It is a wonderful material – I must write more about it some day.

A visitor arriving by elevator

We realised we needed an elevator. I cut a taco box in half, Cakey hole punched it and threaded in a pipecleaner to make a handle. We attached a long piece of string to the pipecleaner. I made a hole in the side of the office tower and threaded the string through it. Now we could pull the elevator up and down. To stop the toy animals plummeting to the ground I stuck a wooden skewer into the cardboard floor. We could tie the elevator string around the skewer and the animals could get alight safely.


Pin It

I hope you have enjoyed this month's BIG and LITTLE, it will be back again next month. If this is your first visit to at home with Ali – welcome. If you like it, you can follow along through our facebook page or subscribe via email or RSS. Cheers Ali


Linked to Serenity You, It's Playtime, Happy Hour Projects and Delicate Construction

Friday, 31 August 2012

Big and Little – Ballet School


Did you see Jillian's wonderful BIG pretend play ballet yesterday over at A Mom with a Lesson Plan? I can't wait to try it out with my girls. And now it is time for our LITTLE Ballet School. We had such fun making our ballet school... in fact we made two, one for Cakey and one for Boo.

Cakey's ballet school

We used a couple of empty nappy (diaper) boxes to make the ballet school studios. Cakey worked on her own, deciding to glue all the cardboard flaps down. She created a performance platform for the ballerinas inside her box.


Boo and I took a different tack and turned the box on its side. I taped our box closed, leaving one of the long cardboard flaps free. I wanted to make a mirror for the dance school studio. I taped down wooden paddle pop sticks to make the cardboard flap stand up. I then covered it with silver foil. We all decorated our ballet school studios by gluing down sheets of metallic card.... and then we left our schools to dry.

Paddle pop sticks holding up the ballet school studio mirror

The following morning we tackled the ballerinas. I got together everything we needed:
  • wooden peg dolls
  • cupcake patty pans for tutus
  • pipe-cleaners for arms
  • little flower felt pieces for hats
  • markers to draw faces
Ballet teacher
    The girls drew faces on the wooden peg dolls. I cut a cross in each of the cupcake patty tutus. Cakey and I poked the peg dolls through the holes and secured them with a little bit of sticky tape. Then we twisted the pipe-cleaners around for arms. I used the hot glue gun to secure the hats. While the hot glue gun was in action we decided to make the ballerinas a ballet bar from pipe-cleaners.


    Using a sharp knife I cut some holes in the cardboard boxes for the ballerinas to 'stand' in. Boo loved pulling them out and putting them back in again... they looked a little worse for wear after she played with them.

    I cut holes just the right size for a wooden peg doll

    Long after Boo and I had discarded our ballerinas, Cakey was still decorating and playing with her ballerinas. She turned her ballet school studio into a theatre and added a tissue paper curtain.


    Pin It

    I hope you have enjoyed this month's BIG and LITTLE, it will be back again next month. If this is your first visit to at home with Ali – welcome. If you like it, you can follow along through our facebook page or subscribe via email or RSS. Cheers Ali


    Linked to Kids Get Crafty, It's Playtime and Kids Co-op

    Friday, 20 July 2012

    Big Construction Site... A Mom with a Lesson Plan


    Today is the day Jillian posts her BIG construction site over at A Mom with a Lesson Plan. Go and have a look.... it is amazing! I really admire her creativity and I can't wait to try her idea in our backyard.

    If you didn't see it, have a look at my LITTLE construction site, the girls loved it.

    I hope you are enjoying our Big and Little series. It will be back next month with a brand new theme.

    Cheers
    Ali

    Thursday, 19 July 2012

    Big and Little... Construction World


    Welcome back to the third installment of BIG and LITTLE (read more about it here). This month's theme, construction, was chosen by Jillian's son. She is going to reveal her amazing BIG pretend play set-up tomorrow on A Mom with a Lesson Plan. But first, here is my LITTLE construction world.


    I decided to set up construction world in our little wading pool. I made a large batch of cloud dough (8 cups of plain flour mixed with one cup of olive oil) and piled it in one corner. In the opposite corner, I placed a pile of blue garden pebbles. I popped our homemade crane between the two piles (click here for the instructions to make a crane).


    I added some wooden blocks, people figurines, a toy truck, digger and excavator. While Boo was having her nap, Cakey got to have a play on her own. She spent her time using the crane to transfer the pebbles to the cloud dough, making a "building base". Cakey built a few walls, made a building and populated it with as many little people as she could find.

    Moving the pebbles with the crane
    Stacking up blocks on her pebble/cloud dough base

    And then Boo woke up. Now, this is the absolute truth – I put Boo in construction world at 2.30pm and she did not get out until 4.30pm. Two hours of play!!! I sat next to her and crocheted a scarf that I started way back in 2010. Boo adored the cloud dough and enjoyed smushing everything she could find into it - blocks, rocks, people and her fingers.

    Moving a block in the crane

    Hours of fun.... literally!
    I can't wait to see what A Mom with a Lesson Plan has for us tomorrow for the BIG. Did you check out Jillian's new ebook? It is awesome. I have already picked up some great ideas about organising our play areas and they are working well.


    If this is your first visit to at home with Ali – welcome. If you like it, you can follow along through our facebook page or subscribe via email or RSS. Cheers Ali

    Pin It

    Linked to Tuesday Tots, Outdoor Play Party and Kids Co-op

    Thursday, 12 July 2012

    Making a crane


    There is a construction site near our house with a huge crane – we like to watch it. I have been thinking about how we could make our own crane... and I finally came up with a solution.

    I stored up two thick cardboard rolls (from cling wrap packs) – these are very sturdy and do not bend. I also found a narrow box from amazon which is made from thick, strong cardboard. I hunted around for another cardboard roll, this time it needed to be slightly wider (not longer) than the cling wrap rolls. The only thing I could find was a toilet paper roll, the width was perfect! I would have preferred something a little sturdier though (see design note at the end of this post).

    The toilet paper roll needs to fit tightly in the box so I cut the hole slightly too small
    Inside the box: I weighed the box down with rocks for stability
    I cut a circle in the top of the box so that with a bit of pushing and squeezing, the toilet paper roll fit tightly into the hole. Because of the tight fit I didn't need to secure the roll to the floor of the box but you could apply a little sticky tape or use hot glue. I filled the box with rocks (to weigh it down) and sealed it up. Then I slipped one of my cling wrap rolls into the toilet paper roll and it rotated very nicely.

    Folded down edges of the thick cardboard roll to create a nook
    For extra strength I taped the rolls together

    For the top of the crane I joined the two cling wrap rolls together. With a sharp knife I cut four shallow incisions at the top of the vertical roll. This enabled me to push down the edges and create a little nook for the horizontal roll to sit in it. It also gave me more surface area to apply glue. I used my hot glue gun to apply glue to the pushed down bits and then held the horizontal roll in place while the glue dried. For extra strength I also taped the rolls together with packaging tape.

    Because one end is short and one long I decided to glue (with the hot glue gun) a rock into the short end to act as a counter balance.


    The rock wasn't enough so I made some little weights using my little concrete blocks. I also made a bucket for the crane by skewering some holes into one of the kids stackable cups. I made a small cut in the top of the horizontal roll for the bucket's string to sit in..... and so, reduce the chance of the bucket flying off as the crane gets swung around.

    The kids really like our toy crane... and I will show you how it got played with next week...

    Design note: The toilet paper roll succumbed to the pressure of play so I have now replaced it with a paper towel roll instead – it is longer and thicker. I have hot glued the roll in place and I am going to add a layer of sticky tape too. I suspect that this area of the crane will need repair from time to time.

    Repaired crane – I replaced the tp roll with a paper towel roll, it is held in place with hot glue.
    The new paper towel roll was smaller than the tp roll so I used hot glue to plug the gaps

    If this is your first visit to at home with Ali – welcome. If you like it, you can follow along through our facebook page or subscribe via email or RSS. Cheers Ali

    Pin It

    Linked to It's Playtime, The Sunday Showcase and The Kids Co-op