Showing posts with label Backyard bounty. Show all posts
Wednesday, 30 April 2014
Rainy Day Fort
A quick little post for a quick and easy activity.... the rainy day fort. My kids love making an umbrella fort when it is raining. They grab every umbrella we own and construct a fort that they can sit under in the rain. It does work best for that lovely light summer rain. They do get wet while they are trying to construct the fort and fill in any of the gaps. If the rain is heavier I throw a tarp over the whole thing which keeps it nice and dry. Enjoy the rain!!!!
We love forts of all shapes and sizes. For more fort inspiration check out my Forts, hidey holes and garden nooks Pinterest board.
If this is your first visit to At home with Ali – welcome. If you like it, you can follow along via email, RSS, google+ or facebook. You can also find me on Pinterest and Instagram.
Wednesday, 13 February 2013
Leaf and Surface Rubbings
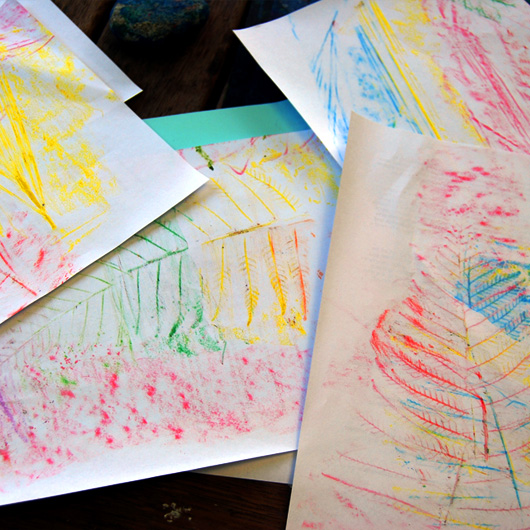
Did you make leaf rubbings as a kid? Yes of course you did... it is a classic. There is something about the whole discovery aspect that makes rubbings so much fun. I keep a small batch of cheap, waxy crayons just for rubbings, these crayons are useless for drawing but are perfect for rubbings. Oil pastels (my favourite type of crayon) do not make very good rubbings. I don't know why.
![]() |
| Rainbow leaf rubbings – ferns work really well |
My next plan is to venture down the street with paper and crayons and see what textures we can find in the neighbourhood.
If this is your first visit to At home with Ali – welcome. If you like it, you can follow along via email, RSS, google+ or facebook. You can also find me on Pinterest and Instagram. Cheers Ali

Linked to Tuesday Tots and Kids Get Crafty
Wednesday, 23 January 2013
Fairy Apartment Block
I love arty projects that you can do over a few days. This was one of those projects..... a fairy apartment block. Now for the fairy purists out there – I know that fairy houses are supposed to be made from all natural materials rather than man-made materials. We have a copy of the book Fairy Houses by Tracy Kane which is a great resource for natural fairy house building. BUT we live in the city and our fairies are quite urbane, so we thought they needed a luxury high-rise apartment block.
Day 1
We found an old wooden CD rack at the side of the road. We dragged it home and gave it a good wash with sudsy water. Then we let it dry.
Day 2
The three of us had a chat about the apartment block colour scheme. We started painting. Cakey painted a lovely picture of flowers on the outside. Boo and I painted and splashed paint on the inside of the apartment block. Then we let it dry.
Day 3
We took our dry and colourful fairy apartment block down to laneway garden and set it up for the fairies. We decorated the rooms with flowers and small boxes filled with playdough and little animal friends. The fairies visited their apartment block and played.
We do make natural fairy houses too. Cakey loves to build little fairy tents from sticks. Boo is good at collecting seed pods and flower petals. I was going to write a post about this as it keeps the kids very busy in our local park but all the photos look like this......
![]() |
| It is hard to photograph a pile of sticks |
If this is your first visit to At home with Ali – welcome. If you like it, you can follow along via email, RSS or facebook. You can also find me on Pinterest and Instagram. Cheers Ali

Linked to Kids Get Crafty, It's Playtime and The Kids Co-op
Tuesday, 15 January 2013
Herb and Flower Tea Party
Cakey enjoys the imaginary aspect of this game and I get to 'taste' tonnes of herb tea. Yum! Boo just loves the chance to stir and pour. This is a fabulous summer-time water play activity. We play this in the winter too.... I use warm water in an attempt to offset the cold.
For more outdoor activities check out my Pinterest board Outdoor Fun for Kids
If this is your first visit to At home with Ali – welcome. If you like it, you can follow along via email, RSS or facebook. You can also find me on Pinterest and Instagram. Cheers Ali

Linked to Tuesday Tots, Monday Kid Corner, It's Playtime and The Kids Co-op
Friday, 2 November 2012
Big and Little..... Explorers sensory play
Big and Little is back... and this time we chose the theme Explorers. Before you read on head over to A Mom with a Lesson Plan to check out her awesome BIG backyard explorer dress up. Jillian and her kids have made some great props for their backyard adventures. go now, I'll wait.....
Now onto my little explorers sensory/pretend play set-up. I was inspired by the book We're Going on a Bear Hunt by Michael Rosen and Helen Oxenbury for this activity, where a family make their way through grass, water, mud and snow to find a bear.
So, early one morning while the kids were glued to the television I set up some LITTLE explorer fun. It was a total surprise to to them when they discovered four sensory stations (with a little challenge in each) set up outside:
I asked the girls to pick out their favourite toy figurine and explained how this little game would work. Cakey has watched her fair share of Dora so she totally got it. Cakey started at the grassy forest and made her figurine take the challenge. Boo took one look at the whole set-up, dropped her figurine, ran around the grass, water and mud and dived straight into the shaving foam.
Cakey made her figurine go through the course over and over. I had to keep re-making the snow mountain as Boo kept destroying it before Cakey's figurines made it to the end.
Once the figurines were discarded the kids mixed all the ingredients together.... creating a lovely sensory mess!!
I hope you have enjoyed this month's Big and Little. If you want to see more about our Big and Little posts click here. If this is your first visit to At home with Ali – welcome. If you like it, you can follow along via email, RSS or facebook. You can also find me on Pinterest and Instagram. Cheers Ali

Linked to Mom's Library, The Sunday Showcase, The Kids Co-op and The Children's Bookshelf
Now onto my little explorers sensory/pretend play set-up. I was inspired by the book We're Going on a Bear Hunt by Michael Rosen and Helen Oxenbury for this activity, where a family make their way through grass, water, mud and snow to find a bear.
So, early one morning while the kids were glued to the television I set up some LITTLE explorer fun. It was a total surprise to to them when they discovered four sensory stations (with a little challenge in each) set up outside:
- A tray of GRASS clippings. The challenge: under the grass I drew 2 lines – one would lead to the next station and the other straight into the arms of a yellow monster arrrrrgh.....
- A tub full of blue coloured WATER. The challenge: I placed a sea monster and some sharks in the tub, the kids would need to find some boats to get their figurines safely across.
- A baking tin filled with MUD. The challenge: I placed a couple of 'poisonous' lizards in the mud, the girls would need some stones for their figurines to hop across.
- A tray with a mountain of shaving foam as SNOW coloured with green food colouring. The challenge: find the treasure (gold coins) hidden in the mountain.
I asked the girls to pick out their favourite toy figurine and explained how this little game would work. Cakey has watched her fair share of Dora so she totally got it. Cakey started at the grassy forest and made her figurine take the challenge. Boo took one look at the whole set-up, dropped her figurine, ran around the grass, water and mud and dived straight into the shaving foam.
Cakey made her figurine go through the course over and over. I had to keep re-making the snow mountain as Boo kept destroying it before Cakey's figurines made it to the end.
Once the figurines were discarded the kids mixed all the ingredients together.... creating a lovely sensory mess!!
I hope you have enjoyed this month's Big and Little. If you want to see more about our Big and Little posts click here. If this is your first visit to At home with Ali – welcome. If you like it, you can follow along via email, RSS or facebook. You can also find me on Pinterest and Instagram. Cheers Ali

Linked to Mom's Library, The Sunday Showcase, The Kids Co-op and The Children's Bookshelf
Thursday, 20 September 2012
Leaf people
This was an after dinner craft.... a rare thing in our household. Craft before bed generally ends badly but this did not. I had a large pile of magnolia leaves left over from a flower bouquet. The kids caught me bundling them into a container ready for bath time. I thought they would make excellent lily pads in the bath. The girls wanted to make leaf people with them instead.
Magnolia leaves are lovely – glossy green on one side and dusty brown on the other. I gave the kids a permanent marker each and they quickly figured out that the markers would only work on the brown side. Cakey drew very happy faces and Boo made lots of marks.
I pulled out our stack of plain coloured circle stickers to create faces on the glossy green side of the leaves. Cakey got very busy and made a stack of leaf people – some happy and some sad. Boo over-handles stickers and they lose their stickiness by the time she gets them into position. I gave her a tub of glue and she happily glued her stickers to the leaves.
The kids wanted their leaf people to 'hold hands'. I helped staple them together to create lovely leaf families.
For another way to use plain shape stickers have a look at our sticker monsters.
If this is your first visit to at home with Ali – welcome. If you like it, you can follow along through our facebook page or subscribe via email or RSS. Cheers Ali

Linked to Cheerios and Lattes, It's Playtime, The Kids Co-op and Kids Get Crafty
Thursday, 6 September 2012
Glitter sticks
Sticks are awesome! We regularly come back from the park with a collection of them.... sometimes the sticks are released back into the garden and sometimes we make them 'pretty'. This time we decided to make a glittery stick forest with our latest collection.
The kids love air drying clay and this was the perfect opportunity to use it again. We propped up our sticks in lumps of air drying clay – it is much sturdier than playdough. It would have been good to let the air drying clay dry before painting but the girls would not wait. They wanted a pink and purple stick forest so out came the paintbrushes and paint tubs. Once the paint was applied they went crazy with the glitter shakers and the sticks became 'pretty'.
When the paint was dry the kids set up their glittery stick forest up in our laneway fairy garden.
If this is your first visit to at home with Ali – welcome. If you like it, you can follow along through our facebook page or subscribe via email or RSS. Cheers Ali

Linked to It's Playtime and The Kids Coop
Tuesday, 10 July 2012
Planting agave pups
Off to the garden centre to buy one enormous replacement pot and some little ones for the pups. Planting the pups now will give them time to get established so by Christmas they will have new growth and be looking lovely (hopefully).
Agaves are very hardy succulents and are easy to replant. There are many types of agave – we have agave attenuata which is native to Mexico. It is a spineless variety so it is perfect for kids and grows well in pots. They are expensive to buy in garden centres because they are slow growing. Once an agave is approximately 10 years old, pups will grow off the mother stem which can be cut from the plant and potted.
Agaves like good drainage so we lined the bottom of our pots with large pebbles. We also used a special potting mix specially designed for succulents which is available from garden centres.
The kids love to help with planting and got busy shoveling soil into pots. We re-planted more than 12 pups. We gave our little agave pups some water and Cakey placed pebbles in the top of the pots. Agaves like a sunny position so we found a good place for them in the garden and now we are awaiting the new growth.
A word of warning: agaves do not tolerate frost. If you are in an area not suitable for agaves but you would like to propagate plants with the kids I recommend trying geraniums or slow-growing japanese box. If you would like to know more have a look at these links:
- How to propagate geraniums from cuttings
- Gardening Australia Fact sheet: Propagation
- How to propagate a buxus (japanese box and other hedge varieties)
If this is your first visit to at home with Ali – welcome. If you like it, you can follow along through our facebook page or subscribe via email or RSS. Cheers Ali

Linked to Fun Sparks
Tuesday, 26 June 2012
Outdoor pretend cafe
My sister is busy planning a tea party for my niece's 3rd birthday party. She has been visiting charity shops and buying cute cups and saucers. What a great way to get an eclectic ceramic tea set without breaking the bank!
Cakey, Boo and I visited our local charity shop. The kids were very excited. They loved choosing their own cups and mugs from the huge variety of shapes and designs. We made it out of the charity shop with the help of a lovely man carrying our box full of ceramics: tea pots, sugar bowls with lids (my kids love lids), milk jugs, tea cups with matching saucers and coffee mugs.
Cakey and Boo are no strangers to making pretend tea and coffee – they call themselves the 'cafe makers'. Previously they had been using plain plastic cups and jugs. They were keen to try out their ceramics – each one slightly different in design, some with flowers or butterflies, some with gold trim or others bold and bright.
We set up the 'cafe' immediately, positioning the table over a grassed area to reduce the chance of any breakages (we didn't lose a single piece). I gave each girl a bucket of warm water. I filled their sugar bowls with flour (pretend sugar) and handed over a couple of spoons, teabags and some old, stale loose tea in a tin. They happily made 'delicious' concoctions, regularly overfilling their cups and watching the tea leaves run down the sides.
Our almost 2 year old, Boo, loves this sort of play. She used to be hesitant when it came to messy play. Watching Cakey throw herself into water play has been a wonderful example. Now she does not hold back. Our ecletic ceramic tea set has a permanent home on our patio and I expect it will be used over and over again.
For more water play ideas for toddlers have a look at this post from Creative with Kids.
If this is your first visit to at home with Ali – welcome. If you like it, you can follow along through our facebook page or subscribe via email or RSS. Cheers Ali
Tuesday, 19 June 2012
Flower sponge printing
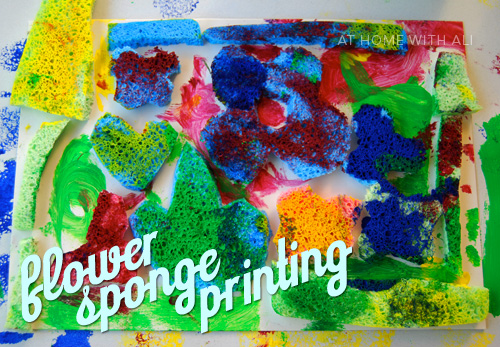
We love flowers in our house – we love to pick them, press them, draw them and paint them BUT we have never printed them. Then, I saw this brilliant idea from Teach Preschool – printing with sponges. I bought a few packs of cheap sponges and Cakey and I got cutting. She made a beautiful flower composition with her sponges. I was almost tempted to stop right there.... but we were both intrigued to see how the printing would work.
And, this is what we did:
- We cut out sponge flowers and shapes and glued them onto cardboard with pva glue. I would recommend a stronger glue if you want the sponge pieces to stick to the cardboard permanently..... this will make sense later.....
- When Cakey was happy with her sponge composition I made her wait for 10 minutes to let the glue dry before we started the printing process. I would have preferred more waiting time but kids don't like waiting!
- We mixed up a watery paint mixture in a tray. Our paint choices were really random - there was some watercolour paint and some acrylic too. We used a few colours in the tray.
- Cakey pressed her sponge composition into the paint tray and then transferred it onto the paper. At first she didn't press hard enough in the tray or on the paper but she soon got the hang of it.
- I helped Cakey to remove the sponge composition from the paper. We repeated this process until the watery paint mixture dissolved the pva glue and the sponge pieces fell off..... which is why you might want to use a stronger glue. On the other hand, my kids were happy to replace printing with soaking the loose sponge pieces in watery paint and squeezing them everywhere.
Check out this post from Red Ted Art for more printing ideas.
If this is your first visit to at home with Ali – welcome. If you like it, you can follow along through our facebook page or subscribe via email or RSS. Cheers Ali

Linked to It's Playtime and Kids Get Crafty
Subscribe to:
Posts (Atom)