Showing posts with label Party ideas. Show all posts

Tuesday, 30 April 2013

A Castle Cake for a Princess Party


Cakey wanted a princess theme for her 5th birthday party. With her agreement we changed it to a castle theme to make it a little more open-ended and boy-friendly. I really had no idea what to do for the cake until my mother pulled out her old copy of the Women's Weekly Children's Birthday Cake Book. Inside was a castle cake that I thought that I could make.

I am not that great in the kitchen. Normally for birthdays, I bake a round cake and decorate it with sweets. This castle cake was going to be my very first fancy cake. I used my usual kid party cake recipe from Donna Hay, this recipe makes a solid cake which is easy to ice and decorate.

Recipe for one basic vanilla cake:
2.5 cups of plain flour, sifted
1.5 teaspoons of baking powder, sifted
1.25 cups of caster sugar (Donna's recipe actually calls for 1.75 cups of sugar but it is way too sweet)
250g butter, melted
4 eggs
1.25 cups of milk
1 teaspoon vanilla extract

Beat all ingredients until smooth. The mixture is quite runny. Pour the mixture into a lined and greased cake tin. Bake at 160 degrees C (320F) for 1 hour and 15 minutes or until cooked when tested with a skewer. I made two of these cakes in a 22cm square tin. I made each cake from scratch because after many baking failures I have finally learned not to double a recipe.

Bake two square cakes

I made a large quantity of fluffy butter cream icing in a pale pink. (I also had extra icing ingredients in the pantry in case I needed to make more.)

Butter cream icing
250g butter, softened
2 cups of icing sugar mixture, sifted
2 tablespoons of milk
Beat the butter with an electric beater until very pale and creamy. Beat in the icing sugar, milk and food colouring.

Now the construction... I chose the flattest cake for the castle's base. I covered it with a thin layer of icing. I squared off the second cake and cut out four, mostly equal, squares for the castle towers. I placed the cake squares (towers) on each corner, the icing acted like a glue.

Cut out four equal, flat squares for the castle towers
At this point Chris took the kids to the park so they wouldn't hear my swearing as I tried to ice the castle cake. I found the joints between the base and the square towers very difficult to ice. In the end I disguised my messy icing with strategically placed liquorice all-sorts, smarties and freckles.

Ice the cake and use ice cream comes for the turrets

Next the turrets... using tall ice cream cones. I placed the cones on top of the iced cake towers. According to the photo in the Women's Weekly the ice cream cones are completely covered in icing. I could NOT get the icing to cover the cones. In the end I only iced the bases of the cones and left the rest of the cones/turrets plain.

We needed some little flags to finish off the turrets. I cut four flag shapes from a piece of folded over paper. I glued the paper flags onto toothpicks and carefully poked the sharp end of each toothpick into the top of each turret. I added candles and I was done. Yay! For her 6th birthday Cakey will be getting a round cake decorated with sweets.....


If this is your first visit to At home with Ali – welcome. If you like it, you can follow along via email, RSS, google+ or facebook. You can also find me on Pinterest and InstagramCheers Ali

Pin It

Wednesday, 5 December 2012

Big and Little – Santa's Village

Santa's village made from cookies, chocolate and sweets

Well all good things must come to an end... this is the last post in our Big and Little Pretend Play series. But not to worry, Jill and I have some exciting, new ideas we are working on – stay tuned in 2013.

NOW get your toothbrush ready and have a look at our edible little Santa's village. Pop over to A Mom with a Lesson Plan to see her Big Pretend Play Santa's village... it is so gorgeous.

Santa's little village

I have seen lots of beautiful gingerbread houses on Pinterest but making my own gingerbread is way beyond my kitchen skills. I also have no idea where you can buy gingerbread house kits in Australia, in fact maybe you can't. So we did the next best thing, we decorated cardboard! I saw this idea in Jane Bull's book The Christmas Book. The kids and I went shopping to buy all the ingredients.

For the cottages:

  • 2 small cardboard milk containers (which I emptied and cleaned)
  • 1 packet of chocolate finger biscuits (cookies), I used Cadbury
  • Chocolate freckles
  • Jelly beans
  • Plain Sao crackers

For Santa's sleigh:

  • 1 packet of plain sweet biscuits (cookies), I used Arnotts milk coffee
  • 1 packet of chocolate finger biscuits (cookies), I used Cadbury
  • 1 packet of round chocolate wheaten biscuits (cookies), these are similar to chocolate covered digestive biscuits
  • Chocolate marshmallow logs
  • Candy canes
  • Foil covered chocolates to fill the sleigh
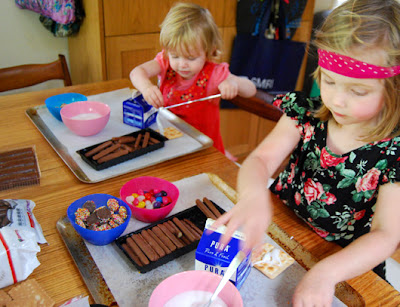
I made a big batch of icing to act as the glue. I mixed icing sugar (powdered sugar) and water to a nice thick consistency (for a strong gingerbread glue have a look at this recipe). Each kid had their own Santa's cottage decorating station on a large baking tray.

Making Santa's village
Getting started on their cottages
Making Santa's cottage
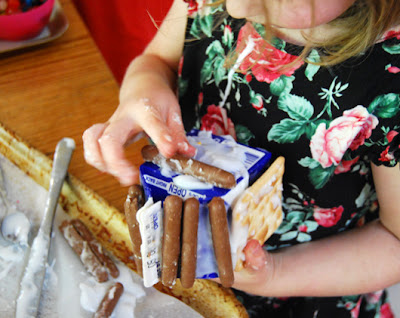
Trying to get those chocolate biscuits to stick

Cakey was determined to cover her cottage with chocolate biscuits, the biscuits worked much better placed horizontally. Boo was not interested in the milk container but she enjoyed decorating the Sao crackers with icing and lollies. Cakey and I happily decorated Boo's cottage for her. Once the cottages were finished we rushed them to the fridge so that the icing would set.

Santa's village

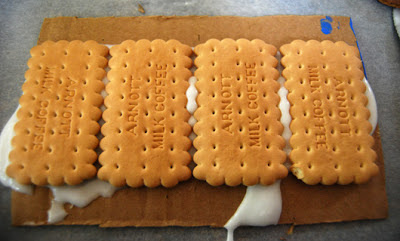
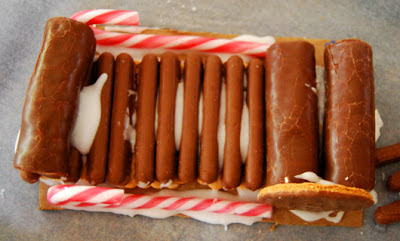
I made Santa's sleigh. It was easier than the cottages because we didn't have to deal with gravity. Starting with a piece of cardboard, I glued down four biscuits (cookies) with icing. I then layered chocolate finger biscuits on top to make the floor of the sleigh. I placed two marshmallow logs at one end to make a comfy seat for Santa. A round chocolate wheaten biscuit was stuck on either side of the marshmallow logs to complete the seat. Two candy cane runners were glued (with icing) directly onto the cardboard along the side of the biscuit layers. And finally, another marshmallow log was stuck to the front of the sleigh to hold all the goodies in. The sleigh followed the cottages into the fridge.

Santa's sleigh
Sleigh base
Santa's edible sleigh

The next day, shortly before friends were due to arrive, we set up our little Santa's village as a table display. The kids sprinkled icing sugar over it to make it white and snowy. We included some little Santa sacks that we had filled with sweets for the visiting kids. The girls loved showing their friends Santa's village and their friends loved taste-testing the village.

Little Santa sacks
Red Santa sacks

If this is your first visit to At home with Ali – welcome. If you like it, you can follow along via email, RSS or facebook. You can also find me on Pinterest and InstagramCheers Ali

Pin It

Linked to Link and Learn, It's Playtime and The Kids Co-op

Thursday, 12 April 2012

Rainbow themed birthday party


Cakey chose a rainbow theme for her 4th birthday. It worked so well, all the kids had a wonderful time.  Here's a few of the things we did:


I covered all our tables with rainbow and unicorn wrapping paper which was inexpensive and looked great. On one table I set up a craft area to make flying rainbows with streamers which I saw on a pretty cool life. This was a simple, non-messy activity that was easy to pre-prepare before the party. I supplied paper plates cut in half with pre-cut streamers, markers, cotton wool balls for clouds, markers, glue sticks and sticky tape. Cakey and I had made prototypes before the party to hang over the table.


There were lots of toddlers attending the party so I also set up a rainbow playdough table with coloured paddle pop sticks and drink umbrellas. I made six batches of playdough (red, orange, yellow, green, blue and purple) during the week before the party. I use an easy no-cook playdough recipe so it didn't take too long (2 cups of plain flour, half cup of salt, 2 tablespoons of vegetable oil, 2 tablespoons of cream of tartar, approximately 1 and a quarter cups of boiling water with food colouring added to the water). This was a popular table!


There was lots of rainbow inspired food too – a huge platter of rainbow coloured fruit as well as paper cups full of popcorn mixed with coloured fruit loops (cheerios). I am not capable of baking a super-fancy cake but I can decorate with the best of them! I made a plain vanilla cake, iced it with butter cream icing and carefully decorated it with coloured chocolate smarties in concentric rings. And of course, we served rainbow orange jellies. The kids pounced on them. To make orange jellies, slice oranges in half and scoop out the flesh. Prepare jelly as per the packet instructions and allow to cool for 20 minutes. Pour the jelly into the empty orange halves and place in the fridge until set. Before serving cut the orange halves into quarters. Kids love them.


Rainbow cake decorated with smarties

The kids and I made our own rainbow party bags, have at a look at this post to see how they turned out. For tonnes of other party ideas check out my party, party, party Pinterest board.

If this is your first visit to At home with Ali – welcome. If you like it, you can follow along via email, RSS or facebook. You can also find me on Pinterest and InstagramCheers Ali

Pin It