Showing posts with label The joy of giving. Show all posts

Friday, 7 February 2014

DIY Toy Camera

DIY toy camera | at home with ali

I have been having some crafty, make it yourself fun. That's what happens when there is nothing worth watching on tv! Anyway the kids own toy cameras and real cameras but that did not stop me from making cardboard cameras.... and the kids like them. They are big and colourful but the best bit is the squishy sponge button they press down to take an imaginary picture. And yes.... they always check the back of the camera to have a look at their shot!

DIY toy camera | at home with ali

Materials:


  • Empty rectangular cardboard box – approximate camera size give or take
  • 2 sheets of A4 coloured paper
  • 2 bottle tops (one big, one small) – I used a vegemite lid and a milk bottle lid
  • String and 2 large buttons
  • A family photo
  • Toilet roll
  • Squishy sponge circle/cylinder – I found one in a package of kids' painting sponges but you can always cut a larger sponge down to size.

Tools:


  • Holepunch
  • Scissors
  • PVA glue or a hot glue gun
  • Sticky tape

DIY toy camera | at home with ali

Step 1: Cover your box in coloured paper while still leaving the top of the box open.

Step 2: Punch holes on either side of your box and thread through the string. Anchor the string on the inside of the box by tying large buttons to each end of your string.

Step 3: Tape the lid closed and cover it with a piece of coloured paper cut to fit.

Step 4: Make the lens – glue the largest bottle top to one of the large sides of the box (the face of your camera). Glue the smaller lid inside the larger one. If you use PVA glue you will need to let the glue completely dry (overnight preferably) before you can move onto the next step.

Step 5: Make the view finder – cut approximately one third off a cardboard toilet roll. Cover it with coloured paper. Sticky tape the toilet roll to one side of the top of your camera.

Step 6: Make the 'take a photo' button – glue the circular sponge onto the other side of the top of you camera. If you use PVA glue you will need to wait until the glue dries before giving it to a kid.

Step 7: Draw on some extra features using a coloured marker or a white-out pen. I drew a flash and some extra buttons just for fun.

Step 8: Stick on a happy snap on the back of your camera.

Step 9: Snap away!

DIY toy camera | at home with ali

If this is your first visit to At home with Ali – welcome. If you like it, you can follow along via email, RSS, google+ or facebook. You can also find me on Pinterest and InstagramCheers Ali


Tuesday, 29 January 2013

Valentines stick dolly gifts

Valentines stick dolly gifts

I finally got my act together and set up some Valentines craft for the girls. I was inspired by these gorgeous wooden stick dollies created by teawagontales. She made them with decorative washi tape and markers. I wanted to make some with the girls. They would make lovely Valentines gifts for friends and family.

I have no idea where to get washi tape in Australia (shop owners look at me strangely when I ask for it). I substituted the washi tape with patterned scrapbooking paper and a gluestick, which was suggested by Christen, one of my lovely facebook followers.

What you need:
  • large wooden sticks (as wide as possible)
  • patterned or coloured paper strips
  • markers
  • gluestick
  • heart hole punch for a Valentines feel
Valentines craft

I cut the paper strips. The girls chose their dolly's outfits and glued them on the sticks They added details with the markers. Cakey gave one dolly a little baby – my favourite of the set.

Valentines stick dolly craft

I made lots of these dollies with the girls. It was fun coming up with funky dolly ensembles. We added hearts cut from a heart-shaped hole punch to our dollies for a Valentines feel. Boo was (and still is) obsessed with the heart hole punch. On the back of each stick we wrote the name of the person who will receive the dolly on Valentines Day.

Valentines stick dolly gifts

For more Valentines inspiration have a look at my Valentines Pinterest Board.

If this is your first visit to At home with Ali – welcome. If you like it, you can follow along via email, RSS, google+ or facebook. You can also find me on Pinterest and InstagramCheers Ali

Pin It

Linked to Kids Get Crafty, It's Playtime, Tuesday Tots and The Kids Co-op

Thursday, 20 December 2012

Peppermint Playdough

Christmas gift of peppermint playdough

I wanted to give something to the kids from our mothers group. I am so grateful to still be meeting up with this wonderful group of mums and kids after 4 and a half years. As I enjoy making playdough and the kids love playing with playdough I decided to make some Christmas peppermint playdough. (I am also grateful to all you readers out there – I wish I could give you all some peppermint playdough)

I make a no-cook playdough. Here is the recipe:

Playdough Recipe

  • 2 cups of plain flour
  • 1/2 cup of salt
  • 2 tablespoons of cream of tartar
  • 2 tablespoons of vegetable oil
  • 1 and a quarter cups of boiling water mixed with your food colouring of choice
  • 6 drops of peppermint oil

Mix all the dry ingredients in a bowl. Add the vegetable oil and peppermint oil. Add the food colouring to the boiling water and then add it to the flour mixture, stir with a spoon. Once the mixture has cooled enough to touch, knead the dough on a floured surface. If the mixture is too soft add more flour, if it is too firm add more water.


I made three batches of playdough (red, light green and white) to make six gift packs. For the white I replaced the plain flour with corn flour. This makes a really white white. When I use corn flour I reduce the amount of water to one cup.


I divided each batch of playdough into six portions and individually wrapped them in cling wrap. Each gift pack contained a portion of red, green and white playdough with a few accessories – red and white patty pans, pom poms and two candy canes. The whole lot was wrapped in clear cellophane and tied up with a pipecleaner.

Peppermint playdough

Playdough makes such a nice gift. If you want more playdough ideas have a look at my Playdough Magic Pinterest board. And you can find all of our Christmas craft right here.

A few more playdough ideas:
Minty Candy Cane Scented playdough Christmas ornaments from Learning 4 kids
A gift of homemade lemon sparkle playdough from An Everyday Story
Woody playscene with pine scented playdough from Small Potatoes
Gingerbread playdough by The Sweet Adventures of Sugarbelle

If this is your first visit to At home with Ali – welcome. If you like it, you can follow along via email, RSS or facebook. You can also find me on Pinterest and InstagramCheers Ali

Pin It

Wednesday, 2 May 2012

A homemade snow dome


Cakey wanted to make a snow dome for her Dad's birthday. I remembered seeing a snow dome on Childhood 101 around Christmas time... so I knew it could be done. Most snow domes have a figurine in the middle but I thought we could use a photo of Cakey and Boo instead. We found a suitable photo, some sticky contact, a glass jar with straight sides and the glitter.


I cut the photo to size. I then cut a piece of contact so that it was wider than the photo by 2cm. I carefully unpeeled the contact backing and lay the photo face up in the middle of the sticky contact. Then I wrapped the contact (now with photo) around the outside of the glass jar, pushing down the tabs of sticky contact to adhere to the glass jar. When you look through the jar – you can see Cakey and Boo.


Next for the fun part. Cakey poured copious amounts of glitter into the jar, I filled it with water and glued the lid closed. Cakey glued some pretty jewels to the top of the lid. In hindsight, I let Cakey put way too much glitter in the jar – there is one serious snow storm in that jar! I should have also chosen a photo of the two girls standing close together as once the water is added to the jar, the photo showing through warps and stretches... but not in a bad way.

Their dad loved his snow dome.

If this is your first visit to at home with Ali – welcome. If you like it, you can follow along through our facebook page or maybe think about subscribing. Cheers Ali

Pin It

Linked to Kids Get Crafty, The Kids Co-op, TGIF and It's Playtime

Monday, 13 February 2012

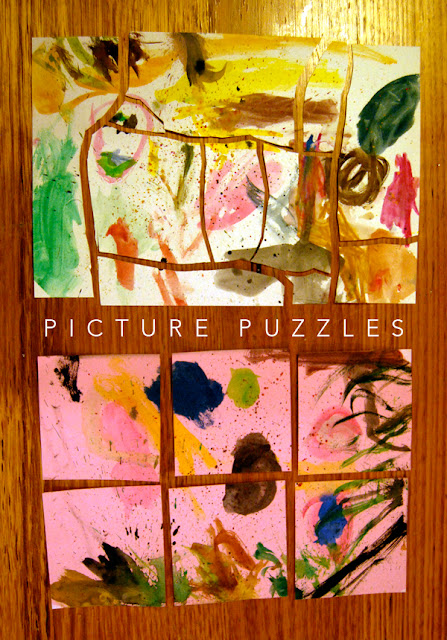
Making a picture puzzle as a gift


Cakey wanted to make a puzzle for her Grandma J's birthday. We decided the best way to do this was to paint a picture and then cut it up. I was not in the mood for dealing with the mess of acrylic paints so I got out our little watercolour paints instead.

I found a beautiful piece of A4 watercolour paper that I taped to the table. I wanted to avoid too much paper warping as Cakey uses a large amount of water. For some reason I forgot to put a messy mat underneath before I taped it... sigh! I also gave Cakey some watercolour crayons to try out (which failed to impress her), a paintbrush and a tub of water.

Cakey painted a lovely picture and particularly enjoyed tapping the brush to make 'little coloured raindrops'. This went so well she wanted to make another – this time I taped down a thick piece of pink construction paper which worked just as well.

painting puzzle

Once Cakey's paintings were dry I unpeeled the tape and photographed them. Then we cut them up. I cut one painting up into nice regular squares. Cakey cut the other into irregular wonky shapes. I had to put a halt to her cutting as the pieces were getting smaller and smaller and any chance that Grandma J was going to be able to put it back together were getting slimmer and slimmer.

I did a test – I put them back together when Cakey was asleep. Her irregular shaped one was far easier than my regular one. Ha – the 3 year old does know best!

Gift for grandma

We packed the picture puzzles into a pink box and I stuck the photos of the complete pictures on top.... and then we posted it to Grandma J.

If this is your first visit to At home with Ali – welcome. If you like it, you can follow along via email, RSS or facebook. You can also find me on Pinterest and InstagramCheers Ali

Pin It

Friday, 18 November 2011

Travelling with kids (mini post box)

We are off on our first big trip as a family very soon. I have never flown overseas with children before and I am nervous – 10 hours on a plane with a 3.5 year old (Cakey) and a 16 month old (Boo)... I pity the people doomed to sit near us.

I have been looking around the shops to buy some little toys for Boo that might keep her occupied but everything was either too expensive or too bulky. So I have made her a miniature posting toy because she loves putting things in containers and then taking them out again.

Miniature post box

To make this, I found some colourful postcards and glued them onto cardboard with pva. When they were dry I cut them into little squares. I then found a little box and cut a hole in the lid so she could post them. I let her test it out to see whether this was going to be a successful toy – it was a winner, she played with it for ages. Now I have it hidden in my suitcase hoping it hasn't lost it's novelty value. The beauty about this is that if pieces get lost under the airplane seats it doesn't matter.

I glued postcards onto cardboard and then cut them into squares

I let Boo have a test go to see whether she liked it – she did.

Cakey loves mail too – she is constantly asking if any of our letters are for her... "nope, just bills" always comes the reply. Anyway, I have put together a little mail kit for her too. This is very simple but I think (hope) she will enjoy it. I collected some interesting promotional postcards you find in cafes. I teamed each postcard with a small white card and a mini highlighter pen and sealed them all in an envelope. I plan to hand these out one at a time on the flight.

Cakey's mail kit

These two ideas are obviously not going to cut it for a 10 hour flight so I have also been stockpiling ideas thanks to some fantastic bloggers who have hit the sky and/or road with kids in tow and lived to tell the tale. So if like me, you are planning on getting away over the coming holidays I am sure you will find something your kids will love in one of these posts:
  • Toddler Approved has a whole bundle of ideas for flying – all gathered from experience!! I particularly like the letter hunt game using the inflight magazine and the barf bag puppets.
  • My creative family has outdone herself with ideas for mess-free travel activity bags designed to occupy kids while driving long distance with a child to adult ratio of 2:1.
  • Sun Hats and Wellie Boots has enough ideas to occupy kids for an entire camping trip. I love the individualized activ ity packs – each designed to make something different. Any kid would be enchanted.
  • Let Kids Create has ideas for a long car trip such as taking baking trays to use for magnet boards and creating backseat pipecleaner creations.
  • Hands on: as we grow has a neat 3 year old friendly version of I spy.
  • Kitchen counter chronicles making use of the humble clip board on long car journeys, and the art of the secret toy.
  • Dinosaurs and Octopuses shows you how to make a geoboard – they aren't going to let you take it on a plane but it would be great for a car journey or on a camping trip.
If this is your first visit to At home with Ali – welcome. If you like it, you can follow along via email, RSS, google+ or facebook. You can also find me on Pinterest and InstagramCheers Ali

Pin It