Thursday 20 December 2012

Peppermint Playdough

Christmas gift of peppermint playdough

I wanted to give something to the kids from our mothers group. I am so grateful to still be meeting up with this wonderful group of mums and kids after 4 and a half years. As I enjoy making playdough and the kids love playing with playdough I decided to make some Christmas peppermint playdough. (I am also grateful to all you readers out there – I wish I could give you all some peppermint playdough)

I make a no-cook playdough. Here is the recipe:

Playdough Recipe

  • 2 cups of plain flour
  • 1/2 cup of salt
  • 2 tablespoons of cream of tartar
  • 2 tablespoons of vegetable oil
  • 1 and a quarter cups of boiling water mixed with your food colouring of choice
  • 6 drops of peppermint oil

Mix all the dry ingredients in a bowl. Add the vegetable oil and peppermint oil. Add the food colouring to the boiling water and then add it to the flour mixture, stir with a spoon. Once the mixture has cooled enough to touch, knead the dough on a floured surface. If the mixture is too soft add more flour, if it is too firm add more water.


I made three batches of playdough (red, light green and white) to make six gift packs. For the white I replaced the plain flour with corn flour. This makes a really white white. When I use corn flour I reduce the amount of water to one cup.


I divided each batch of playdough into six portions and individually wrapped them in cling wrap. Each gift pack contained a portion of red, green and white playdough with a few accessories – red and white patty pans, pom poms and two candy canes. The whole lot was wrapped in clear cellophane and tied up with a pipecleaner.

Peppermint playdough

Playdough makes such a nice gift. If you want more playdough ideas have a look at my Playdough Magic Pinterest board. And you can find all of our Christmas craft right here.

A few more playdough ideas:
Minty Candy Cane Scented playdough Christmas ornaments from Learning 4 kids
A gift of homemade lemon sparkle playdough from An Everyday Story
Woody playscene with pine scented playdough from Small Potatoes
Gingerbread playdough by The Sweet Adventures of Sugarbelle

If this is your first visit to At home with Ali – welcome. If you like it, you can follow along via email, RSS or facebook. You can also find me on Pinterest and InstagramCheers Ali

Pin It

Saturday 15 December 2012

Beads and Buttons – Christmas ornaments

Christmas ornaments with beads and buttons

After the success of combining beads and glue last year I thought we might do it again.... but this time on a smaller scale. We turned our bottle top collection into Christmas ornaments. I poured pva glue into each bottle top... some overflowed causing a gluey mess which irritated me and delighted them. The kids decorated them with beads, buttons and glitter. The heavier beads sunk to the bottom of their white pva ponds.

The kids filled many, many bottle tops. Boo overfilled hers with the larger buttons and beads and Cakey went glitter mad.

Christmas craft beads

Christmas craft buttons glitter

Now the bad news, I did have to do a little pre-prep. I wanted to be able to hang these decorated bottle tops on the Christmas tree. I could have just taped a string to the back of them but I wanted something more secure.

Christmas decorations bottle tops

I poked a hole in each bottle top (milk lids are fairly soft so this was easy, juice bottle lids are rigid so they went back into the bowl) with my pointy cake tester. I thread some thin beading wire through the hole and twisted it so it would hold. Once the glue was poured the twisted wire knot was hidden from view. And now, our decorated bottle top ornaments are looking lovely on our Christmas tree. You can find all our Christmas craft ideas here.

For more bottle top crafts have a look at:


If this is your first visit to At home with Ali – welcome. If you like it, you can follow along via email, RSS or facebook. You can also find me on Pinterest and InstagramCheers Ali

Pin It

Linked to Rainy Day Mum, The Sunday Showcase, It's Playtime and The Kids Co-op

Monday 10 December 2012

Paper Plate Christmas Wreaths


Our paper plate Christmas wreaths were so much fun to make. Both kids loved them and made them their own..... and they spent ages at the craft table, which always makes me happy. The girls were so excited about this wreath craft that they insisted their Dad join them and make one too – he normally stays well away from the glue and sparkles.


There is nothing terribly complicated about this craft. I did do some preparation when the kids were asleep but it didn't take long. I cut the middle out of a stack of paper plates to use as the base of our wreaths. I also cut up Christmas scrapbooking paper into strips... and that was it for the pre-prep.

When the kids were ready to craft I handed over my stack of pre-cut bits, added some tubs of pva glue and paintbrushes and found some Christmassy sparkles. Then I let the kids go for it while I sat down and made my own wreath.... I wasn't going to miss out on all the fun!!


This craft suited both girls, they made their wreaths to suit their age and level. Boo (2.5) glued a little bit of decoration onto a lot of paper plate wreaths. Cakey (4.5) spent more time gluing a lot of decoration onto a few wreaths.

Clockwise: Cakey's wreath, Chris' wreath, my wreath and Boo's wreath
While we waited for the glue to dry, Cakey and I threaded bells onto gold cord. We wanted the bell to dangle in the middle so we punched a hole at the top and taped the cord in place on the back of each wreath. I have displayed them on our mantle piece so Santa can get a good look at them on his way down the chimney.


For more wreath ideas have a look at Easy Toddlers Christmas Wreaths by Mummy Musings and Mayhem.

If this is your first visit to At home with Ali – welcome. If you like it, you can follow along via email, RSS or facebook. You can also find me on Pinterest and InstagramCheers Ali

Pin It

Linked to Kids Get Crafty and Tuesday Tots

Wednesday 5 December 2012

Big and Little – Santa's Village

Santa's village made from cookies, chocolate and sweets

Well all good things must come to an end... this is the last post in our Big and Little Pretend Play series. But not to worry, Jill and I have some exciting, new ideas we are working on – stay tuned in 2013.

NOW get your toothbrush ready and have a look at our edible little Santa's village. Pop over to A Mom with a Lesson Plan to see her Big Pretend Play Santa's village... it is so gorgeous.

Santa's little village

I have seen lots of beautiful gingerbread houses on Pinterest but making my own gingerbread is way beyond my kitchen skills. I also have no idea where you can buy gingerbread house kits in Australia, in fact maybe you can't. So we did the next best thing, we decorated cardboard! I saw this idea in Jane Bull's book The Christmas Book. The kids and I went shopping to buy all the ingredients.

For the cottages:

  • 2 small cardboard milk containers (which I emptied and cleaned)
  • 1 packet of chocolate finger biscuits (cookies), I used Cadbury
  • Chocolate freckles
  • Jelly beans
  • Plain Sao crackers

For Santa's sleigh:

  • 1 packet of plain sweet biscuits (cookies), I used Arnotts milk coffee
  • 1 packet of chocolate finger biscuits (cookies), I used Cadbury
  • 1 packet of round chocolate wheaten biscuits (cookies), these are similar to chocolate covered digestive biscuits
  • Chocolate marshmallow logs
  • Candy canes
  • Foil covered chocolates to fill the sleigh
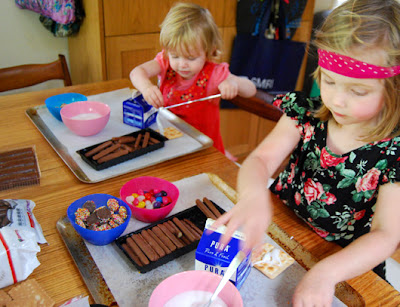
I made a big batch of icing to act as the glue. I mixed icing sugar (powdered sugar) and water to a nice thick consistency (for a strong gingerbread glue have a look at this recipe). Each kid had their own Santa's cottage decorating station on a large baking tray.

Making Santa's village
Getting started on their cottages
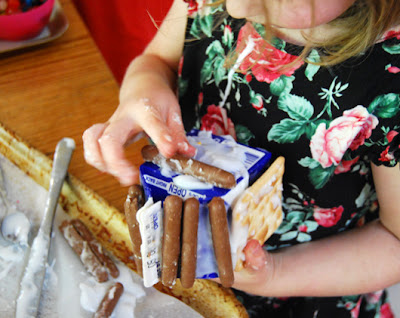
Making Santa's cottage
Trying to get those chocolate biscuits to stick

Cakey was determined to cover her cottage with chocolate biscuits, the biscuits worked much better placed horizontally. Boo was not interested in the milk container but she enjoyed decorating the Sao crackers with icing and lollies. Cakey and I happily decorated Boo's cottage for her. Once the cottages were finished we rushed them to the fridge so that the icing would set.

Santa's village

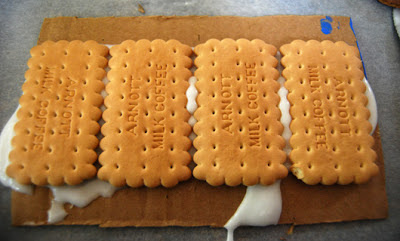
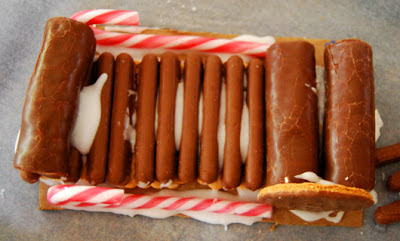
I made Santa's sleigh. It was easier than the cottages because we didn't have to deal with gravity. Starting with a piece of cardboard, I glued down four biscuits (cookies) with icing. I then layered chocolate finger biscuits on top to make the floor of the sleigh. I placed two marshmallow logs at one end to make a comfy seat for Santa. A round chocolate wheaten biscuit was stuck on either side of the marshmallow logs to complete the seat. Two candy cane runners were glued (with icing) directly onto the cardboard along the side of the biscuit layers. And finally, another marshmallow log was stuck to the front of the sleigh to hold all the goodies in. The sleigh followed the cottages into the fridge.

Santa's sleigh
Sleigh base
Santa's edible sleigh

The next day, shortly before friends were due to arrive, we set up our little Santa's village as a table display. The kids sprinkled icing sugar over it to make it white and snowy. We included some little Santa sacks that we had filled with sweets for the visiting kids. The girls loved showing their friends Santa's village and their friends loved taste-testing the village.

Little Santa sacks
Red Santa sacks

If this is your first visit to At home with Ali – welcome. If you like it, you can follow along via email, RSS or facebook. You can also find me on Pinterest and InstagramCheers Ali

Pin It

Linked to Link and Learn, It's Playtime and The Kids Co-op